Mastering the Art of Repotting Indoor Plants – A Guide
This post may contain affiliate links which means I may receive a commission for purchases made through links. As an Amazon Associate, I earn from qualifying purchases. Learn more on my Private Policy page.
Have you ever seen a plant outgrow its pot, its roots desperately searching for space to expand, much like a person craving room to breathe in a crowded room? Just like that plant, indoor plants need the right environment to thrive, and repotting is a crucial step in providing them with that.
But mastering the art of repotting indoor plants is not just about transferring them to a larger pot; it's a delicate process that requires precision and care. So, how do you ensure that your indoor plants not only survive but also flourish after being repotted?
There are several key steps to consider, each playing a vital role in the overall health and growth of your plants.
Selecting the Right Pot Size
Choosing the correct pot size is crucial for the health and growth of your indoor plants. When selecting a pot, it's important to consider the current size of your plant and its root system. A pot that's too small can constrict the roots and limit growth, while a pot that's too large can lead to over-watering and potential root rot. The goal is to choose a pot that provides enough space for the roots to spread out while also allowing for proper drainage.
Ensuring proper drainage is essential for the overall well-being of your indoor plants. Without adequate drainage, excess water can accumulate in the soil, leading to root rot and other moisture-related issues. When selecting a pot, look for one that has drainage holes at the bottom. This allows excess water to escape, preventing waterlogged soil and providing oxygen to the roots. Additionally, consider using a saucer or tray to catch any water that drains out, preventing a mess while still allowing the plant to avoid sitting in standing water.
Consider the size of your plant and its root system when choosing the correct pot size. If your plant is currently in a small pot and you notice roots growing out of the drainage holes, it may be time to repot into a larger container. On the other hand, if your plant is in a pot that seems excessively large with lots of empty space, consider downsizing to a more suitable pot size to prevent over-watering. Remember, the right pot size and proper drainage are essential elements in creating a healthy environment for your indoor plants.
Assessing Plant Health
To assess the health of your indoor plants, carefully examine the leaves, stems, and soil for any signs of disease, pests, or stress. This step is crucial in ensuring that your plants are in optimal condition before repotting.
Here are some key aspects to consider:
- Leaf Health: Inspect the leaves for discoloration, spots, or unusual markings. Yellowing or browning of the leaves can indicate overwatering or nutrient deficiencies, while spots may be a sign of pests or diseases.
- Stem and Branch Condition: Check the stems and branches for any signs of rot, mushiness, or discoloration. Healthy stems should be firm and free from soft spots or blemishes.
- Soil Moisture and Drainage: Assess the moisture level in the soil by inserting your finger about an inch deep. If the soil feels excessively wet or dry, it could indicate issues with drainage or watering frequency.
- Root Health: Carefully lift the plant from its current pot and examine the roots. Healthy roots are white or light-colored, firm, and spread throughout the soil. If you notice a foul odor, mushy texture, or browning, it may indicate root rot or other underlying problems.
Preparing the New Pot
After assessing the health of your indoor plants, the next step in repotting is to ensure that the new pot is prepared for the transplanting process. When choosing decorative pots for your indoor plants, it's important to consider both aesthetics and functionality. Select a pot that complements your home decor while also providing ample space for the roots to grow. Additionally, ensure that the new pot has proper drainage holes at the bottom. Proper drainage techniques are crucial for the health of your indoor plants as they prevent water from accumulating at the bottom of the pot, which can lead to root rot and other issues.
To prepare the new pot, begin by cleaning it thoroughly with mild soap and water to remove any dirt or residue. Once cleaned, place a layer of small stones or broken pottery pieces at the bottom of the pot to help with drainage. This will create a space for excess water to collect without saturating the soil. Following this, fill the pot with fresh, well-draining potting mix, leaving enough space at the top for the plant and its existing root ball.
Choosing the Right Soil
What type of soil does your indoor plant require for optimal growth and health?
When choosing the right soil for your indoor plants, it's important to consider factors such as soil composition and drainage capacity. Here are some key points to keep in mind:
- Soil Composition: Different indoor plants have specific soil requirements. For example, succulents and cacti thrive in well-draining, sandy soils, while tropical plants prefer a mix that retains moisture such as peat-based soil. Research the specific needs of your plant to determine the ideal soil composition.
- Drainage Capacity: Good drainage is crucial for the health of indoor plants. The soil should allow excess water to drain away from the roots to prevent waterlogging, which can lead to root rot. Look for soil mixes labeled as 'well-draining' or 'fast-draining' to ensure proper drainage capacity.
- Nutrient Content: Indoor plants rely on the soil for essential nutrients. Choose a soil mix that's rich in organic matter and contains the necessary nutrients for your specific plant. Alternatively, you can supplement the soil with fertilizers to ensure your plant receives adequate nutrition.
- pH Level: The pH level of the soil can affect nutrient uptake by the plants. Most indoor plants prefer a slightly acidic to neutral pH. Consider testing the pH of the soil or choose a high-quality potting mix with a balanced pH level to support optimal plant growth.
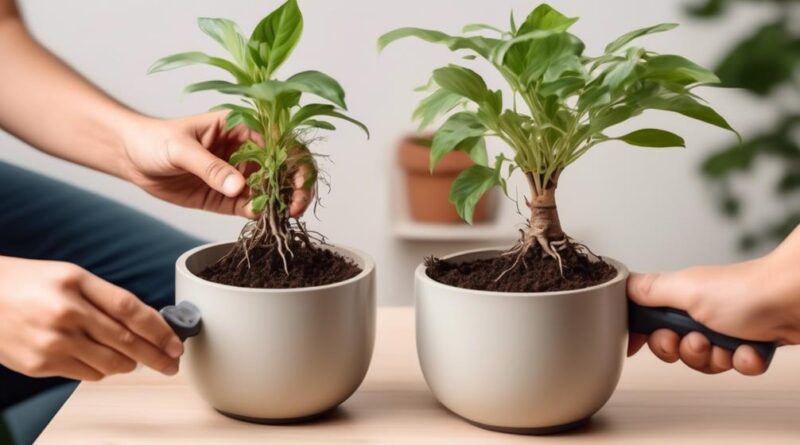
Removing the Plant From Its Current Pot
Now that you understand the importance of choosing the right soil for your indoor plant, the next step in repotting is carefully removing the plant from its current pot. Proper drainage is essential for the health of your plant, and this begins with the careful extraction from its existing container. Start by gently handling the plant to avoid damage to its delicate roots.
To begin, water the plant a day or two before repotting. This will help loosen the soil and make it easier to remove the plant from the pot. Before removing the plant, it's important to ensure that the new pot is ready with fresh, well-draining soil. Carefully turn the potted plant on its side and support the base of the plant with your hand. Gently tap the bottom of the pot to loosen the root ball. Once the root ball is loosened, carefully slide the plant out of the pot, supporting the base of the plant as you do so.
Inspect the roots for any signs of damage or overcrowding. If the roots are circling the root ball, gently tease them apart to encourage outward growth. Avoid pulling or tearing at the roots, as this can cause harm to the plant. Once the plant is free from its old pot, place it in the center of the new pot and fill in the gaps with fresh soil, ensuring the plant is at the same depth as it was in the previous pot.
With the plant successfully removed from its old pot, you're now ready to proceed with the repotting process.
Pruning and Grooming the Roots
To ensure the healthy growth of your indoor plant, carefully inspect the roots for any signs of damage or overcrowding before proceeding with pruning and grooming. Root maintenance is a crucial step in repotting your indoor plant and here's how you can do it effectively:
- Gently Untangle the Roots: Carefully loosen the outer layer of roots with your fingers. This helps prevent the roots from continuing to grow in a circular pattern, which can lead to root binding.
- Root Trimming: Trim any excessively long or damaged roots with clean and sharp scissors. When cutting, aim to maintain a balanced root system to support the plant's growth in its new pot.
- Inspect for Diseases: Take this opportunity to check for any signs of root rot or diseases. Trim away any discolored or mushy roots to prevent the spread of infection.
- Encourage New Growth: Once you have completed the necessary root maintenance, consider applying a root stimulating fertilizer to encourage new root growth. This will aid in the plant's acclimatization to its new environment.
Placing the Plant in the New Pot

After completing the crucial step of pruning and grooming the roots, you're ready to carefully place the plant in its new pot. Before doing so, ensure that the new pot has proper drainage. This is essential for preventing waterlogging, which can lead to root rot. Choose a pot with drainage holes at the bottom to allow excess water to escape.
When placing the plant in the new pot, handle the roots gently to avoid root damage. Position the plant in the center of the pot at the same depth it was previously planted. Then, fill the pot with fresh, well-draining soil, ensuring that the roots are evenly covered. Gently pat down the soil to provide stability for the plant.
As you settle the plant into its new home, make sure that it's sitting straight and upright. This will encourage even growth and stability. Avoid packing the soil too tightly, as this can hinder proper drainage and air circulation around the roots.
Once the plant is in place, water it thoroughly to help settle the soil and hydrate the roots. After repotting, it's important to place the plant in an appropriate environment to aid its recovery. Keep an eye on the plant over the next few days to ensure it's adjusting well to its new pot.
Watering and Care After Repotting
Consider watering your repotted indoor plant sparingly in the first few days to minimize stress on its roots. Caring for newly repotted plants is crucial to ensure their successful transition to a new environment. Here's what you need to know about adjusting watering post repotting:
- Monitor the Soil Moisture: Keep an eye on the moisture level of the soil. Only water the plant when the top inch of the soil feels dry to the touch. Overwatering can lead to root rot, especially when the plant is still acclimating to its new pot.
- Use Room Temperature Water: When watering your newly repotted plant, use room temperature water. Cold water can shock the plant, while hot water may have adverse effects on the roots.
- Avoid Fertilizing Immediately: Hold off on fertilizing your plant right after repotting. The plant needs time to settle into its new home, and adding fertilizer can cause stress. Wait at least a month before considering fertilization.
- Provide Adequate Light and Humidity: While adjusting watering post repotting is essential, also ensure that your plant is placed in an environment with suitable light and humidity levels. Proper placement can aid in the plant's recovery and minimize stress.
Frequently Asked Questions
How Can I Tell if My Indoor Plant Is Root Bound and in Need of Repotting?
If your indoor plant is root bound, it may show signs like slow growth, roots emerging from the drainage holes, or the plant being overwatered or underwatered frequently. Repotting can help the plant thrive.
Can I Use Regular Garden Soil for Repotting My Indoor Plants, or Do I Need a Special Type of Soil?
You should avoid using regular garden soil for repotting your indoor plants. Instead, opt for a special type of soil designed for indoor plants. This soil provides better drainage and aeration, which is crucial for the health of your indoor plants.
Is It Necessary to Trim the Foliage of My Indoor Plant Before Repotting, and if So, How Much Should I Trim?
Before repotting, it's good to trim the foliage of your indoor plant. This helps reduce stress on the plant and encourages new growth. Aim to remove any dead or damaged leaves, and consider trimming back long, leggy stems for a healthier, more balanced appearance.
What Are Some Common Signs That I May Have Overwatered or Underwatered My Indoor Plant After Repotting?
If your indoor plant shows yellowing leaves, wilting, or soil mold, it might be overwatered. If the leaves are dry, crispy, or drooping, it might be underwatered. Adjust your watering schedule to prevent these issues.
Can I Use a Decorative Pot Without Drainage Holes for Repotting My Indoor Plant, or Is It Important to Have Drainage?
Yes, you can use a decorative pot without drainage holes for repotting your indoor plant, but it's important to have proper drainage. Special soil and avoiding overwatering can help prevent issues with root bound or overwatered plants.
Conclusion
Now that you've mastered the art of repotting indoor plants, you can enjoy watching them thrive in their new homes.
With the right pot size, soil, and care, your plants will continue to grow and flourish.
Remember to assess their health, prune the roots, and provide proper watering after repotting.
Your green thumb will surely shine as you give your indoor plants the care they need to thrive.
Keep up the good work!